# RevenueCat
If you use RevenueCat to manage subscriptions across platforms, you can connect purchases made through your Zellify funnels to RevenueCat so that users who buy on the web automatically receive access inside your mobile app.
RevenueCat handles this through its own direct integrations with Stripe and Paddle. Zellify does not send purchase data to RevenueCat. Instead, RevenueCat receives transactions directly from your payment provider via server-to-server notifications and grants entitlements based on those events.
With this setup, you can:
* Grant entitlements in your app based on web funnel purchases
* Keep subscription status in sync across web and mobile
* Attribute web conversions to RevenueCat subscriber profiles
* Optionally enrich RevenueCat customer profiles with Zellify funnel and campaign metadata
***
## How It Works
When a user completes a purchase in your Zellify funnel, the payment is processed by Stripe or Paddle. RevenueCat receives that transaction through a server-to-server webhook from the payment provider, matches it to a subscriber, and grants the corresponding entitlement.
The key linking mechanism is the `app_user_id`. Zellify already sets `app_user_id` in [Stripe Customer and Subscription metadata](https://docs.zellify.app/platform-introduction/stripe#metadata) and [Paddle Customer and Transaction custom data](https://docs.zellify.app/platform-introduction/paddle#metadata) on every checkout. RevenueCat can be configured to read this `app_user_id` from metadata, which is how it associates the web purchase with the correct RevenueCat subscriber.
Your setup involves two parts:
1. **Connect RevenueCat to your payment provider** (required) — follow the Stripe or Paddle section below to configure server-to-server notifications and entitlement mapping
2. **Enable the Zellify RevenueCat toggle** (optional) — pre-creates a RevenueCat customer profile at checkout and attaches Zellify funnel metadata
***
## Connecting RevenueCat to Stripe
If Stripe is your payment provider, you need to connect your Stripe account to RevenueCat and configure server-to-server notifications so RevenueCat can track purchases and grant entitlements.
1. **Connect your Stripe account to RevenueCat** — In the RevenueCat dashboard, navigate to your project and connect Stripe under Apps & Providers. Follow [RevenueCat: Connect Stripe Account](https://www.revenuecat.com/docs/web/connect-stripe-account).
2. **Configure server-to-server notifications** — Add the RevenueCat webhook endpoint in your Stripe dashboard under Developers → Webhooks. This is how RevenueCat receives transaction events from Stripe. Follow [RevenueCat: Stripe Server Notifications](https://www.revenuecat.com/docs/platform-resources/server-notifications/stripe-server-notifications).
3. **Enable "Track new purchases from server-to-server notifications"** — In RevenueCat's Stripe webhook settings, turn this on so new purchases are automatically tracked when the webhook fires.
4. **Configure App User ID detection** — Enable the option to read the `app_user_id` from Stripe metadata fields. Zellify sets `app_user_id` on every Stripe Customer and Subscription, and RevenueCat uses this to match the purchase to the correct subscriber.
5. **Map Stripe products to RevenueCat entitlements** — In RevenueCat, add your Stripe products to the appropriate entitlements so purchases unlock access in your app. See [RevenueCat: Stripe Integration](https://www.revenuecat.com/docs/web/integrations/stripe) for full details.
Once configured, any purchase made through your Zellify funnels via Stripe will be automatically tracked by RevenueCat and the corresponding entitlement will be granted.
***
## Connecting RevenueCat to Paddle
If Paddle is your payment provider, connect Paddle to RevenueCat and configure server-to-server notifications.
1. **Connect Paddle to RevenueCat** — In RevenueCat, create a Paddle configuration under Apps & Providers and enter your Paddle API key. Follow [RevenueCat: Paddle Integration](https://www.revenuecat.com/docs/web/integrations/paddle).
2. **Configure server-to-server notifications** — Apply the RevenueCat webhook configuration in your Paddle account so RevenueCat receives transaction events directly from Paddle. Follow [RevenueCat: Paddle Server Notifications](https://www.revenuecat.com/docs/platform-resources/server-notifications/paddle-server-notifications).
3. **Enable "Track new purchases from server-to-server notifications"** — In RevenueCat's Paddle webhook settings, turn this on so new purchases are tracked automatically.
4. **Configure App User ID detection** — Enable the option to read the `app_user_id` from Paddle custom data. Zellify sets `app_user_id` on every Paddle Customer and Transaction, and RevenueCat uses this to match the purchase to the correct subscriber.
5. **Map Paddle products to RevenueCat entitlements** — In RevenueCat, add your Paddle products to the appropriate entitlements so purchases unlock access in your app.
Once configured, any purchase made through your Zellify funnels via Paddle will be automatically tracked by RevenueCat and the corresponding entitlement will be granted.
***
## Customer Metadata Enrichment (Optional)
The steps above are all that is required to grant entitlements from web purchases. The Zellify RevenueCat integration is an optional addition that enriches RevenueCat customer profiles with Zellify-specific metadata.
When enabled, Zellify calls the RevenueCat API at checkout initiation to:
* Create a RevenueCat customer using the same `app_user_id` that is set on the Stripe or Paddle customer
* Attach metadata to the customer profile:
* Email
* Funnel ID
* Campaign ID
* Experiment ID
* Organization ID
This does not send purchase or transaction data to RevenueCat and does not grant entitlements. Entitlements are granted by RevenueCat when it processes the Stripe or Paddle server notification, as configured in the sections above.
This is useful if you want Zellify funnel and campaign context visible directly on subscriber profiles inside RevenueCat. The same metadata is already available on your Stripe or Paddle customers, so this step is only necessary if you want it surfaced inside RevenueCat as well.
***
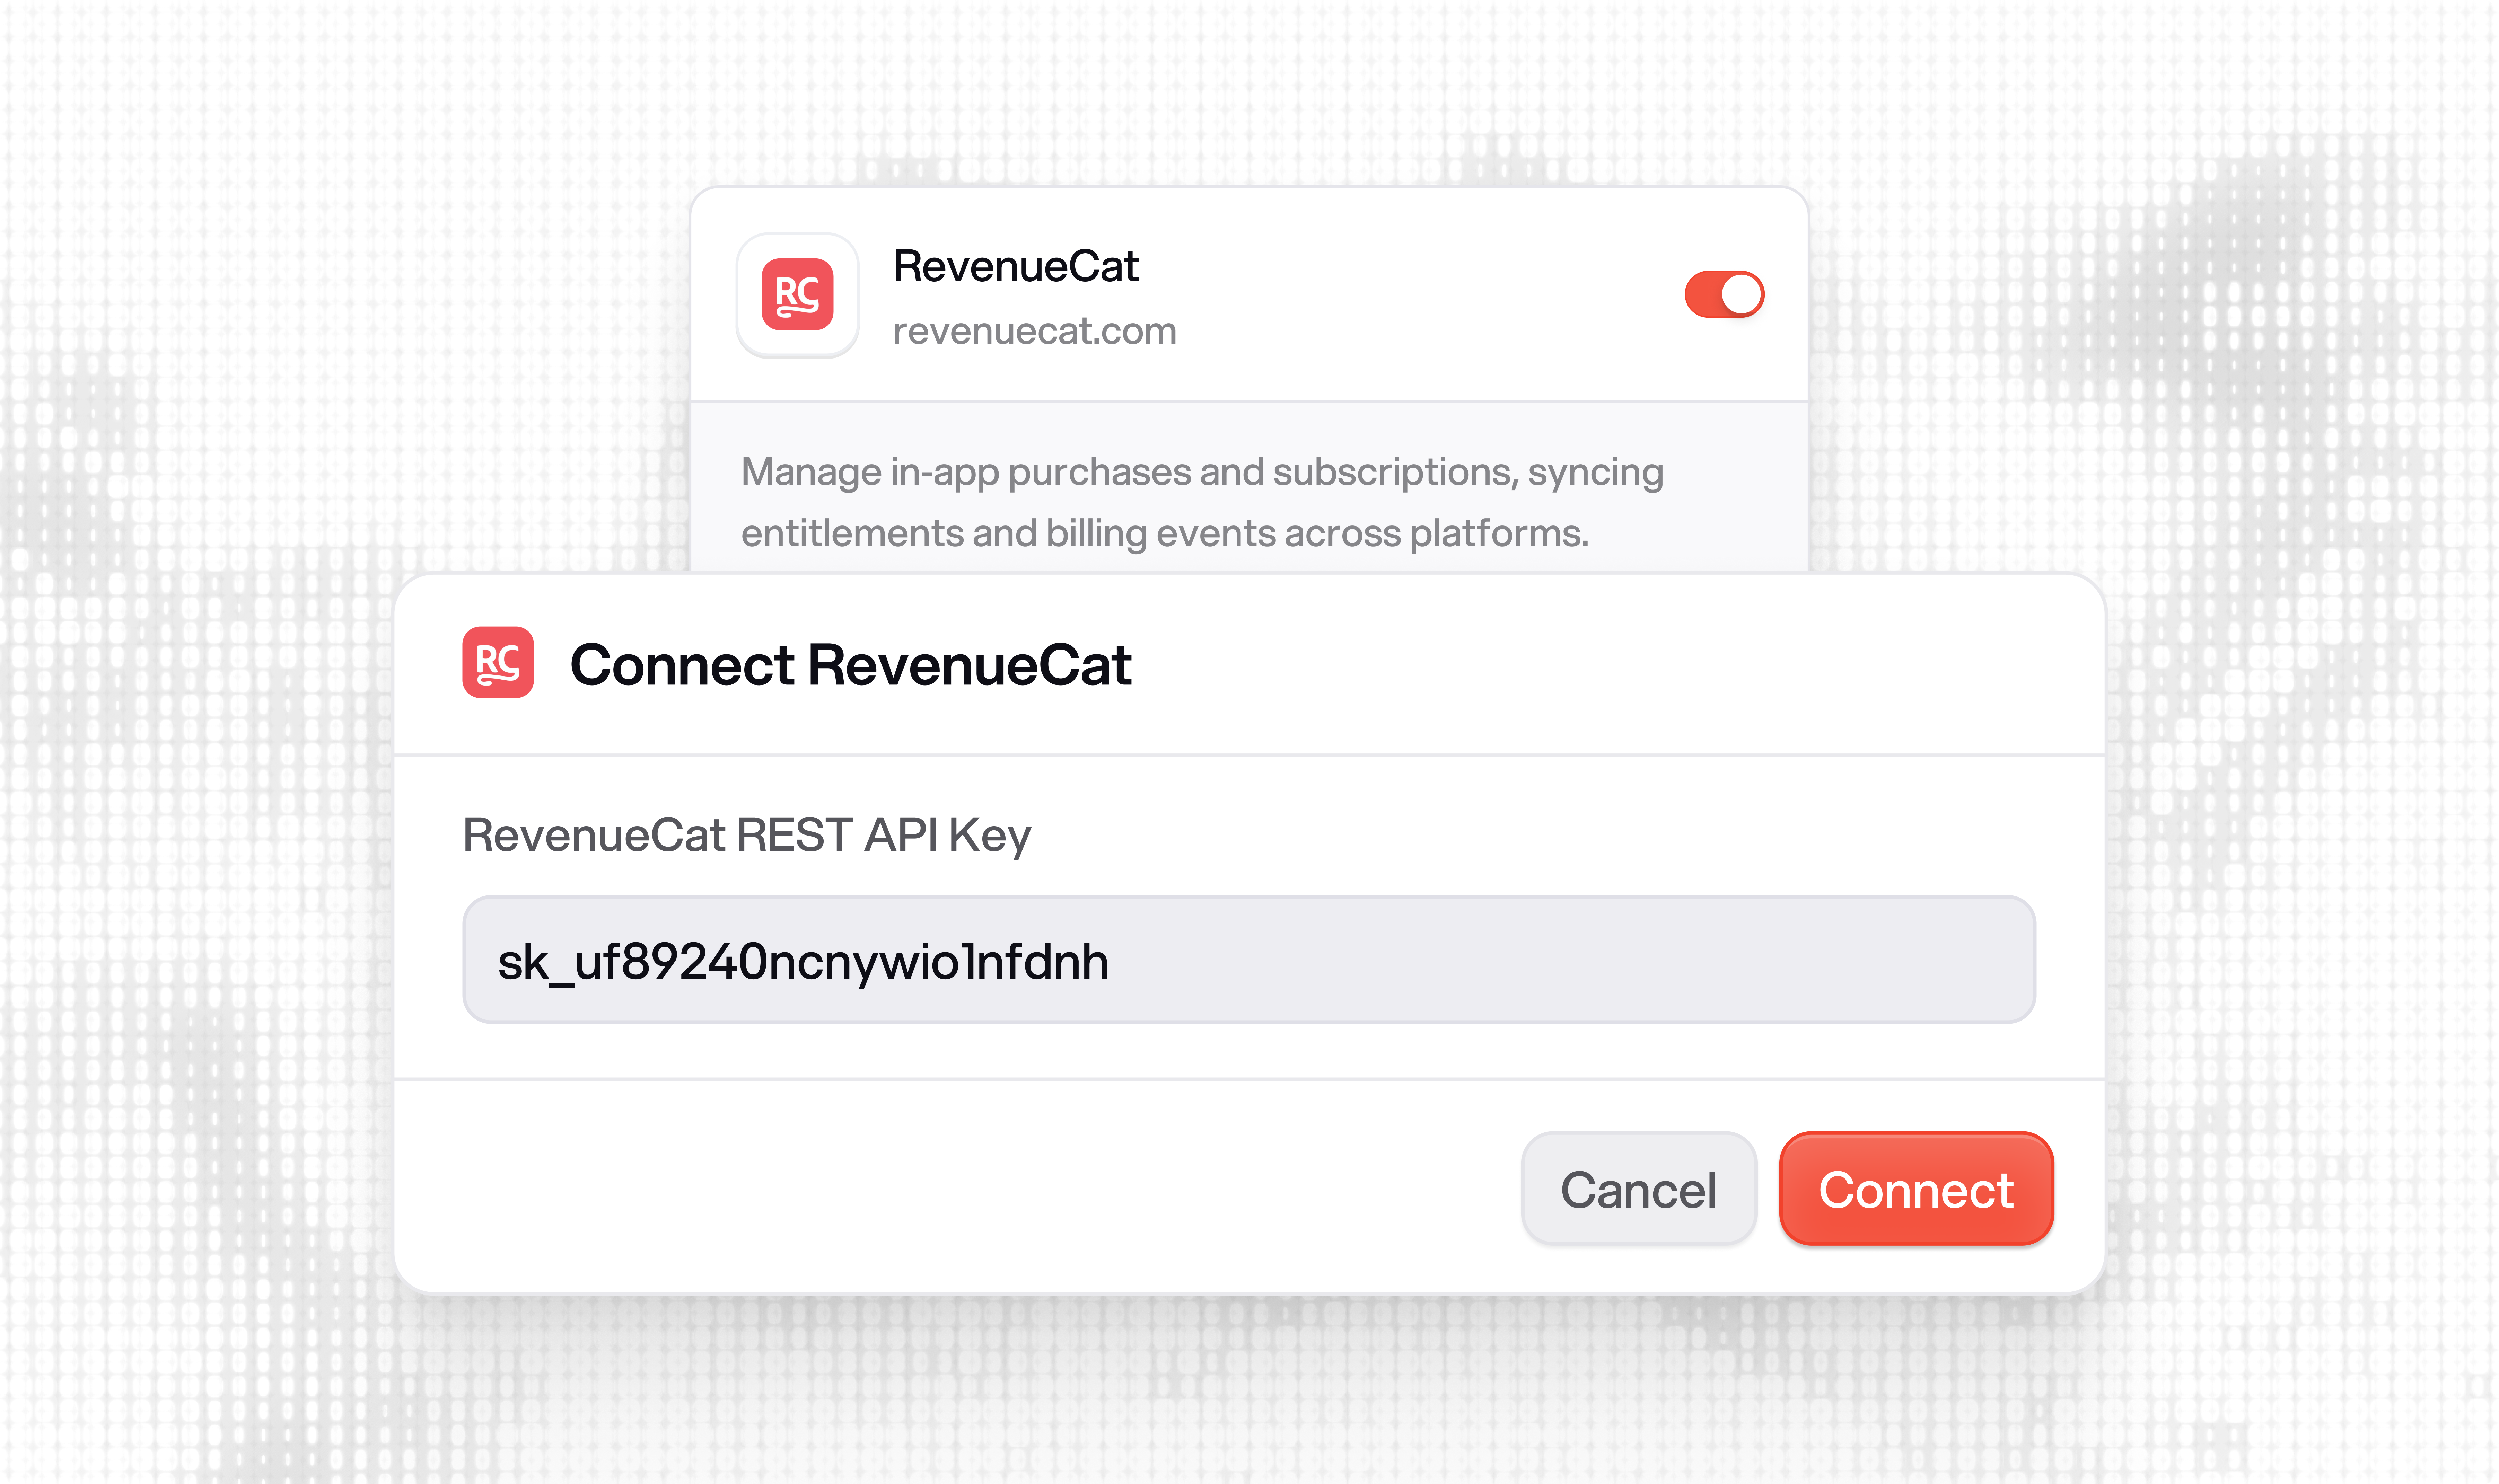
### Enabling the Integration
To enable the metadata enrichment:
Dashboard → Settings → Integrations\
1. Locate **RevenueCat**
2. Toggle the integration on
3. Enter your **RevenueCat REST API Key**
***
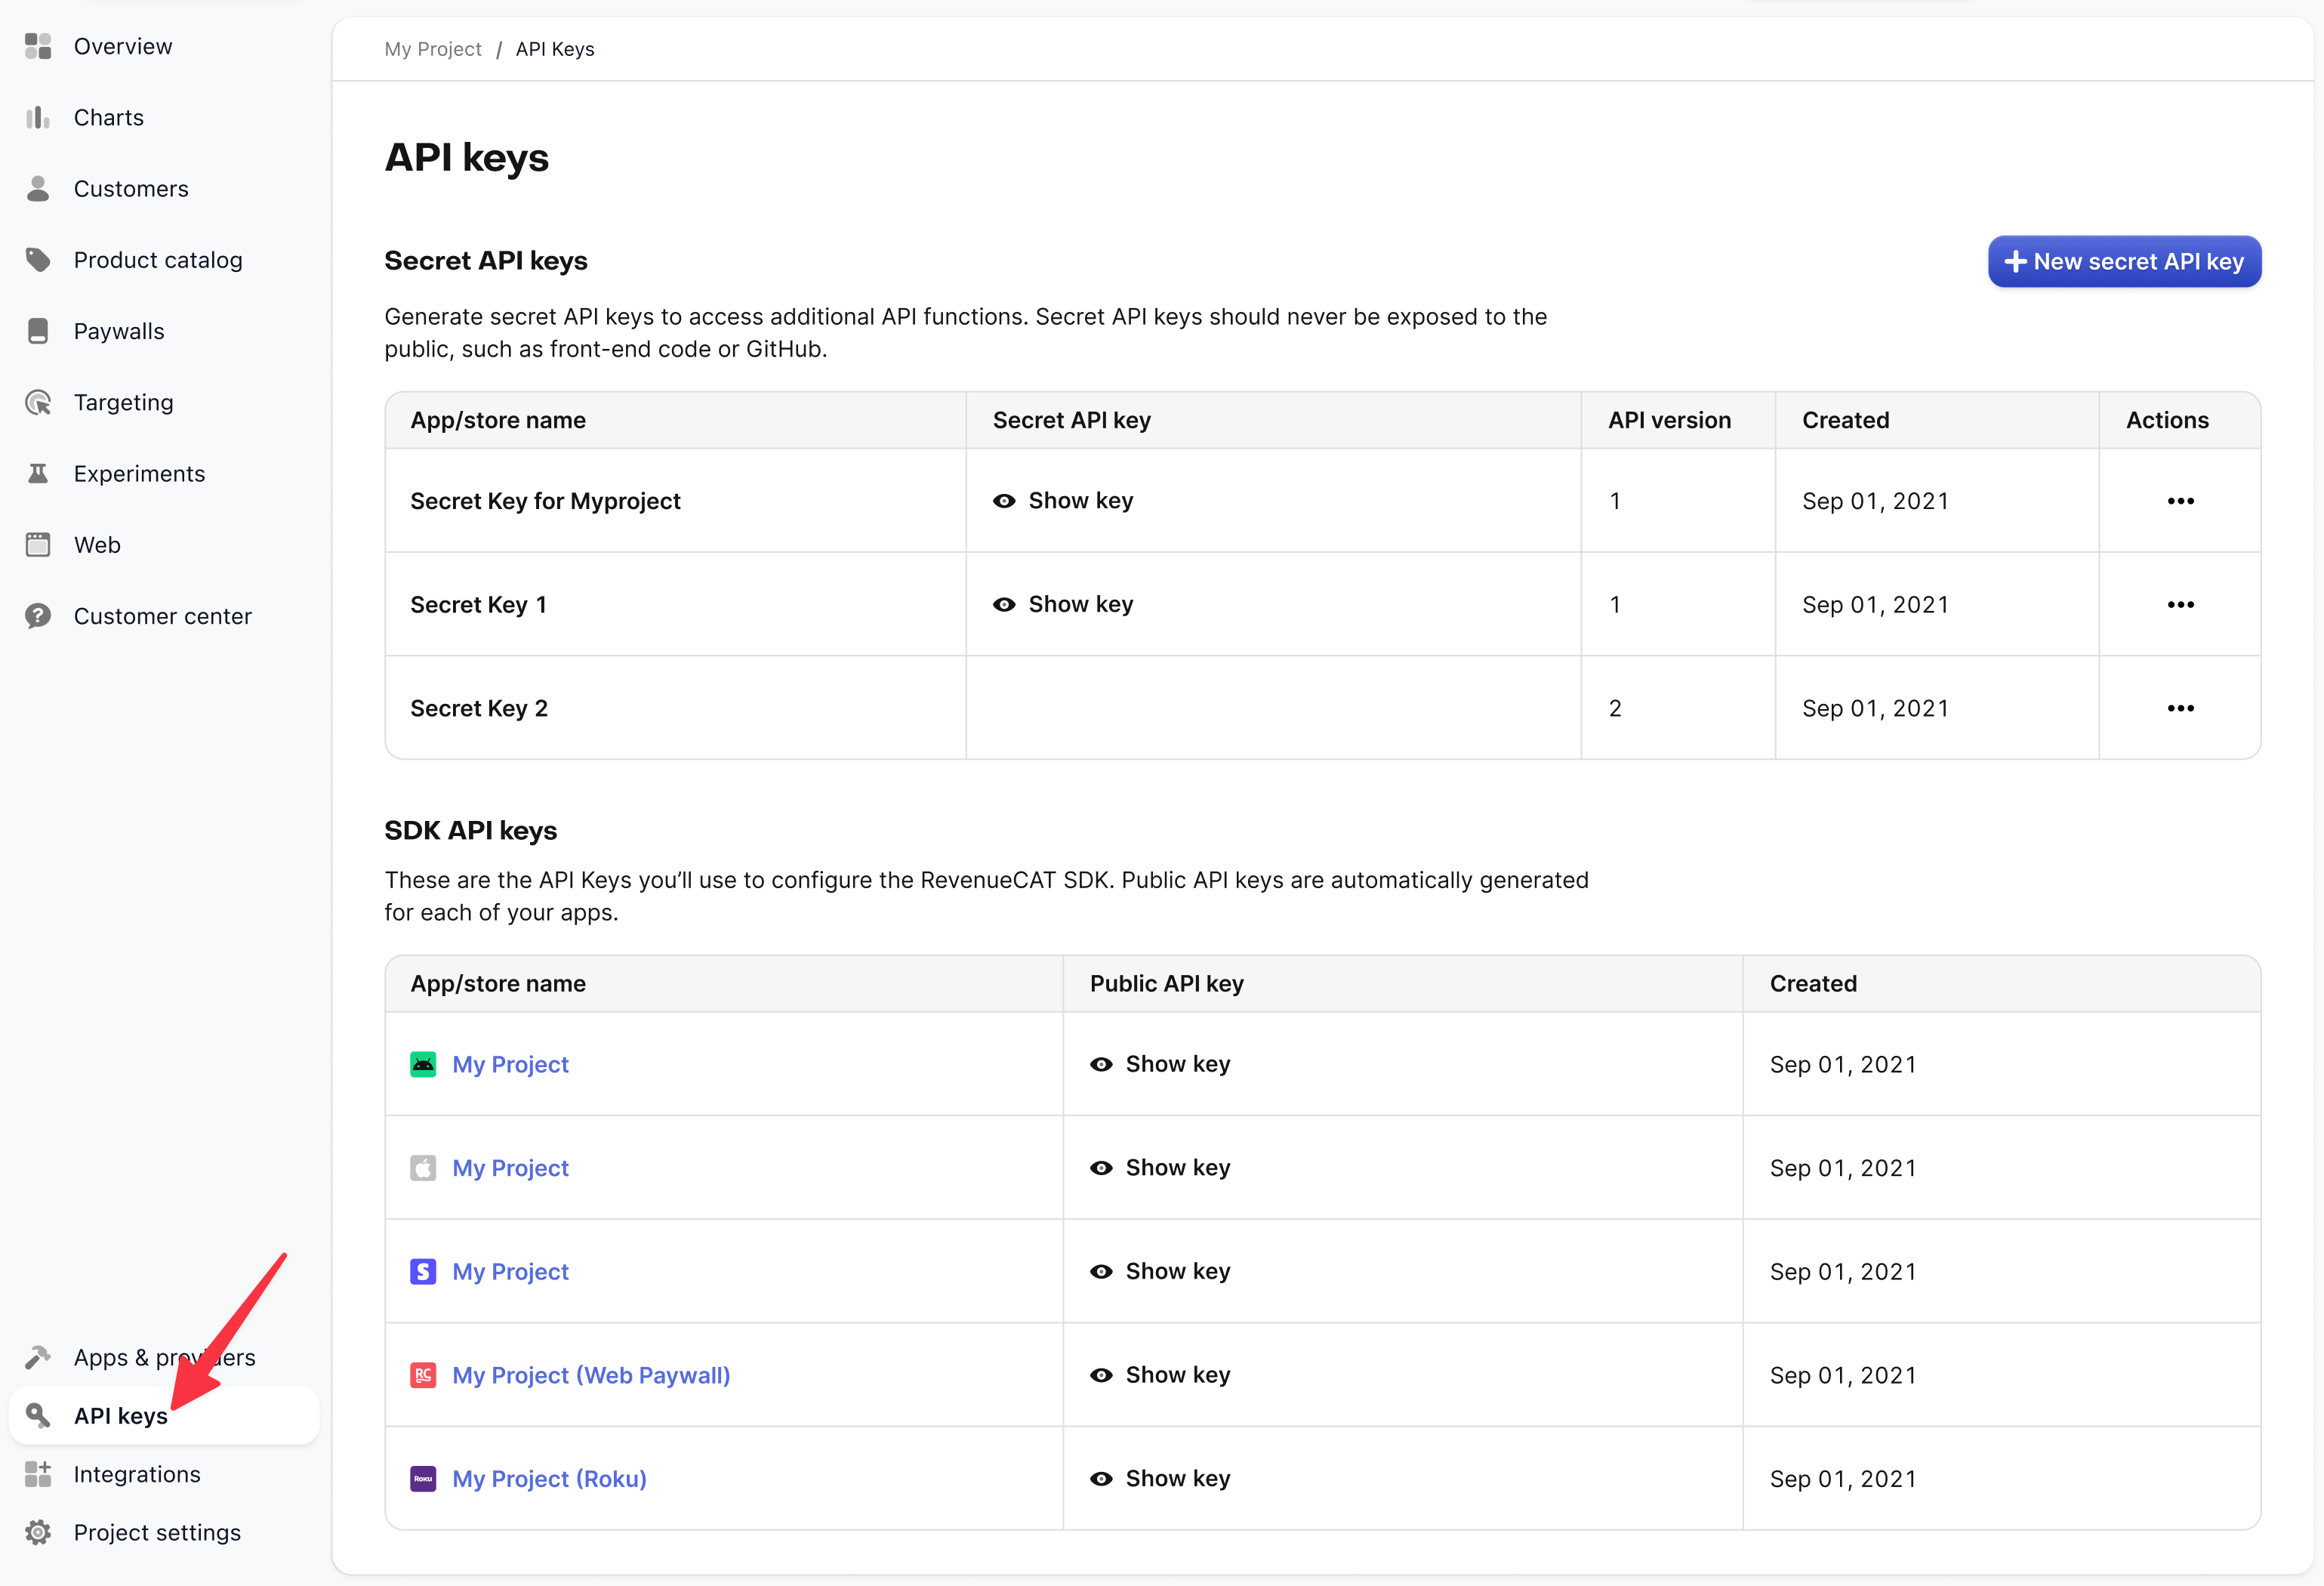
### Finding Your RevenueCat REST API Key
To find your API key in RevenueCat:
1. Go to your **RevenueCat Dashboard**
2. Open your **Project**
3. Navigate to **Project Settings → API Keys**
4. Copy your **REST API Key** (starts with `sk_`)
5. Paste the key into Zellify
***
## When to Use This
**For granting entitlements from web purchases** (required):\
Follow the [Stripe](#connecting-revenuecat-to-stripe) or [Paddle](#connecting-revenuecat-to-paddle) setup above. This is configured entirely in RevenueCat and your payment provider — no Zellify integration toggle is needed.
**For Zellify metadata on RevenueCat profiles** (optional):\
Enable the Zellify RevenueCat toggle if you want to see funnel, campaign, and experiment data directly on subscriber profiles in RevenueCat.
If you only sell through web funnels and do not have a mobile app using RevenueCat, this integration is not required.
{% embed url="" %}